We've spoken to leading designers from around the world, and asked
them to reveal the free and paid best iPad apps for design, creativity,
inspiration and organisation.
In this first instalment, covering the 40 best iPad apps for
designers, we've spoken to Nicholas Patten, Dan Mall, Jeffrey Zeldman,
Elliot Jay Stocks, Si Jobling, Ben Winter, Claudio Guglieri, D. Keith
Robinson, Brian Hoff, Anna Anna Dahlstrm, John A. Jacobs, Shane Mielke,
Anthony Woods, and Ajaz Ahmed, to find the iPad apps that they simply
couldn't live without.
Bigger screen, bigger apps
Unlike the iPhone, Apple's tablet has enough screen space to enable
more complex interactions. It's therefore no surprise many within the
design industry are using iPads for research, organisational tasks,
finding inspiration and even creating work. In this feature, designers
give us their take on the best iPad apps for designers.
If we've missed your favourite in our list of the best iPad apps, let us know in the comments.
Nicholas Patten
Based in New York City, Patten is a video editor, graphic and web designer, and product manager of DirectMarkets. You can follow Patten on Twitter here, and you can also check out his very own iPad app, Spatik, which enables you to combine sharing services in one app (he cheekily worked it into his list, so read more below).
Given how hugely complicated Photoshop for desktop is these days, a part of us wishes Adobe Photoshop Touch wasn't just for iPad
It may not be Photoshop CS6,
and Adobe Photoshop Touch isn't without its limitations--there's no RAW
import, and the maximum image export size is 1600-by-1600; however, it
retains enough of its desktop cousin's features (and places them in a
sleek, pared-down, tablet-optimised interface) to make it an essential
purchase, and one of the best iPad apps for designers. Patten says he
particularly likes "how it allows the user to still use layers and
control opacity levels and blend modes". And the fact that it costs less
than a pub lunch doesn't hurt either.
Adobe Ideas: providing all of the colours (but, sadly, none of the skills) to enable you to draw pretty flowers
Suitably named, the thinking behind Adobe Ideas is to get visual
brainwaves down rapidly. The app provides a simple but effective toolset
for outlines, thumbnails and rough drawings, and you can draw over the
top of images (photos, screen grabs) should you wish to. Usefully,
exports are vector-based and so can scale indefinitely. "It's a great
app for fast sketching of any ideas and designs," he enthuses.
TouchDraw is the perfect app for crafting vector hillsides.
It's also not bad for logos and floor plans, if hillsides aren't your
thing
Although seemingly in a similar space to Adobe Ideas, TouchDraw is a
more full-featured vector-drawing app. While it's suited to
illustration, it also enables you to create libraries of reusable shapes
or use bundled examples; TouchDraw is therefore suitable for working up
flow charts, graphs, diagrams and floor plans along with logos and
other imagery. However, Patten believes it's the interface that makes it
one of the best iPad apps: "I like how the toolset doesn't take up much
space, giving you more room to edit the image."
Palettes Pro might have an interface that breaks your eyes, but it's great for rapidly creating colour schemes
Although the previous three products showcase how the iPad can enable
you to create artwork, some apps turn your device into a focussed
environment for critical ancillary tasks. For example, Palettes Pro
provides the means for creating myriad colour schemes, either from
scratch, through the use of colour models, or by grabbing colours from
photographs and websites. "I really like the way it enables easy colour
capture, and how it gives you the ability to build themes for anything
you like," says Patten.
Spatik: for those times when you want to automate sharing, like you're living in the future with a robot butler
Patten's snuck one of his own creations into our list of the best
iPad apps--he's the co-creator and CEO of Spatik. However, the
recommendation itself is sound, with the app enabling you to combine
services that help you share into a single app. "Spatik has all of my
RSS feeds to design articles, inspirational sites and tutorials, and I
use it to organise my daily tweets," he says, explaining the the app was
designed to "make it easier to set-up daily tweets in a timely
fashion".
Dan Mall
Award-winning designer Dan Mall has in the past worked for Happy Cog
and Big Spaceship and is currently founder and design director at SuperFriendly. Dan is also a technical editor at A List Apart, and - via his love/obsession for typography - he is also the co-founder of Typedia and swfIR.
Beautiful typography? Check. New iPad? Check. An absurd amount of time wasted with FontBook? Definitely
'Comprehensive' is perhaps the best word to describe FontBook, which
documents over 100 type foundries, representing 1650 type designers,
constituting 35,000 fonts. Over-the-air updates ensure the data is
always up to date, but Mall is most impressed by the manner in which the
app enables you to explore typefaces: "There are resources online for
browsing type categorically, but this app lets me browse non-linearly,
which makes for a completely organic discovery experience."
Biophilia fuses art, interactivity and music, and probably makes traditionalists running record labels cower in fear
The iPad has made some of those working in traditional media rethink
how creative output should be presented--books, movies and music are all
being reconsidered by people in the field that have an experimental
bent. Bjrk's app marries music with art, in what Mall calls "an
excellent example of making music an interactive experience". He adds:
"It's a different way of thinking about what a visual and auditory
touchscreen experience can be."
Shadow: making web designers who create and test mobile websites weep with joy since early 2012
Mobile is increasingly important in the web design space, but testing
websites on mobile devices can be a tedious experience. Shadow enables
you to pair devices with a computer, and browse in sync, along with
editing pages using remote inspection. "Adobe Shadow makes development
across multiple devices much easier," explains Mall. "The ability for
every device to update changes in sync is absolutely priceless and saves
hours of debug time."
Claudio Guglieri
Guglieri is a senior designer at Fi (Fantasy Interactive)
in New York City, and is also a 'free time' Flash developer. Claudio's
work can be found on the Fi website, and you can also find a selection
of his latest projects on his Dribbble page. If you'd like to keep up with what Claudio's doing day to day, then you should also check out his Twitter page.
LiveView shows your Mac's screen on an iPad, so you can prototype interfaces (or, in this case, actually start making one).
Many modern designers are immersed in designing for mobile, but
smartphones and tablets boast wildly different resolutions to desktop
monitors, and so it can be tough to visualise how work will look on
device screens. LiveView is one of the best iPad apps for quick 'n'
dirty simulation, which mirrors your computer screen on a connected
iPad. "It's the one iPad app I can't live without," claims Guglieri.
"After trying dropping files on Dropbox, emailing screenshots and using
Image Capture, this is by far the best app I've used to see what I
design, at the correct scale, on an iPad."
Photoshop CS6 has arrived, and a new version of the world's number
one image editing tool is always a highlight. In this review we reveal
all the new features.
Those looking for the much-heralded Deblur filter will be
disappointed: it's far too early for inclusion this time around. In
fact, those looking for big splashy show-off features in Photoshop CS6
will also be looking in vain. (Check out reviews of the other apps in Adobe CS6.)
Adobe Photoshop CS6 is largely an under-the-bonnet release, bringing a
few new tools and filters but concentrating on greater speed,
efficiency and ease of use. But the improvements are great, and this
Photoshop CS6 review will reveal all!
Before we begin: security check
Before you begin, you should ensure that your copy of Photoshop CS6
is the most recent release version. A security exploit, enabling
malcicious users to compromise your system, was reported at the start of September. Simply go to Help>Updates in Photoshop CS6
and apply all updates. Users of Creative Cloud will have these updates
pushed to their system when they next connect to the service.
Acceleration in Photoshop CS6
Photoshop CS6 makes full use of your computer's Graphics Processing
Unit (GPU), which provides tremendous acceleration in many areas. So the
Liquify filter, previously a sluggish experience, is accelerated to
provide smooth, real-time smearing even with brushes up to the new
maximum limit of 15,000 pixels; the new Oil Paint feature adds a
paint-like texture, with controls that operate on the full-screen
preview in real time. Of course, all this depends on you having a fast
enough processor and graphics card; although CS6 will run on Windows
XP/Mac OS X 10.6 with just 1Gb RAM, you do need a hardware-accelerated
OpenGL graphics card to get the most out of it. The Liquify filter in PhotoshopCS6 is now smooth as silk,
with real-time operation even at huge image sizes and with brushes up to
15,000 pixels in diameter
The new features
The first thing you notice about Photoshop CS6 is its new interface.
You now have the choice between four base colours, from near-black to
pale grey - so Photoshop can look more like Lightroom if you choose.
Everything has been subtly tweaked, from the hundreds of redesigned
icons (the Pen and Lasso tools now indicate their active hotspots more
clearly) to a crisper, more consistent layout. Photoshop CS6's new dark look will appeal to photographers,
as it's less distracting. The ability to filter layers by type is also a
major enhancement
New HUD with key info
A new Head Up Display system (HUD) in Photoshop CS6 provides key
information right at the cursor. This is context sensitive, so will show
dimensions when dragging out a marquee, angles when rotating a
selection, and so on. It also applies to the three new Blur filters,
each of which provides a different type of blur - Field, Iris and Tilt
Shift - with strength and radius controls directly on the image, rather
than just in a side panel. All three new filters are also GPU
accelerated for real-time previews. Tilt-Shift is just one of the three new Blur filters in
Photoshop CS6, each of which works in real time thanks to GPU
acceleration. The controls are placed directly on the image for ease of
access
Photoshop CS6 filters
There's just one new tool in Photoshop CS6, the Content-Aware Patch
tool, which takes the technology introduced in CS4 (Content-Aware
Scaling) and CS5 (Content-Aware Fill) and extends it to a tool that
allows us to select and move or extend objects in a scene, patching
their original location more or less seamlessly. In practice, the
results depend very much on having the right image; it's a great idea,
but doesn't always come up with the goods. The new Content-Aware Patch tool in hotoshop CS6 can both
move and extend objects - working well with organic objects, less well
with man-made structures
A major new filter is Adaptive Wide Angle, which allows you to
correct camera distortion simply by drawing over lines that should be
straight. A hugely powerful tool, it allows even stitched panoramas with
multiple perspectives to be corrected into a single landscape shot. The new Adaptive Wide Angle filter in Photoshop CS6 does a
great job of correcting camera distortion: simply drag over straight
lines to make the adjustment
Enhanced Camera Raw
Also good for photographers is the enhanced Camera Raw dialog, which
now has more powerful versions of tools such as Clarity (there's now no
halo effect, even at maximum strength) and Defringing (the controls are
gone, replaced by a single checkbox which just does the job). For the
first time in Photoshop CS6, it's also possible to apply localised noise
reduction. Enhancements to Camera Raw in Photoshop CS6 include a
greatly improved Clarity control, as well as the ability to apply
localised noise reduction using adjustment brushes
Lighting Effects filter in Photoshop CS6
The Lighting Effects filter has had a major overhaul, ditching the
previous tiny preview in favour of a full-screen, GPU-accelerated
preview that shows changes in real time. It's of particular benefit to
Mac users, for whom Lighting Effects disappeared in Adobe Photoshop CS5
unless they were running the program in sluggish 32-bit mode.
Tool enhancements
Designers will love the new Paragraph and Character Style panels in
Photoshop CS6, which allow favourite combinations to be set and adjusted
at will - as well as the fact that Shapes layers are now true vector
objects, which means you can now apply strokes inside, outside and
centred on paths, as well as being able to stroke open paths. Those
strokes can now be dotted and dashed, and can be filled with gradients.
Adobe Photoshop CS6 will now not only save in the background,
allowing you to carry on working while it's saving, but will also
auto-save a version avery few minutes so that, in the event of a crash,
you can pick up from where you left off. If you still manually revert to
a saved file, though, it will always go back to the one you
deliberately chose to save, rather than its own intermediate version.
Photoshop CS6 Crop tool
The Crop tool has been reworked so that cropping now pans the image
behind the crop window. It seems a little unintuitive at first, until
you rotate a crop, when it suddenly makes sense: now, the image rotates
behind the window, so you can see how it will look without having to
crane your neck as you did previously.
The Select Color Range tool now has an option to select skin tones -
and, within it, a separate option to select faces. In practice, it works
remarkably well: it's not perfect, and when used in conjunction with a
mask on an Adjustment Layer it will require some manual fine-tuning, but
it's a big help. The Select Color dialog in Photoshop CS6 can now select
skin tones automatically, with a special Face Detection mode that
performs well - even when the subjects are wearing hats and sunglasses.
Extending Actions in Photoshop CS6
Actions, the means by which you can automate repetitive tasks, have
been extended so that they can now store brush movements as well as menu
and selection choices. This means that for the first time it's possible
to record an entire painting operation, and have it played back with a
single keystroke.
Layer tweaking
Photoshop CS6 includes a lot of small enhancements that will
generally make much life easier for those working on complex artwork.
The Layers panel now has built-in filtering, so you can choose to view
just layers set to Hard Light mode, or those containing text, or Smart
Objects, or Adjustment Layers - or just about any parameter you can
think of. It's now possible to change opacity, light mode and colour
coding on multiple layers, so if you search for all the text layers in a
document you can change them all to yellow for easy reference. The Mask
and Adjustment panels have now been combined in a new Properties panel,
which is resizable for ease of adjustment.
It's also now possible not only to use Layer Groups as the basis of
Clipping Masks, but to apply Layer Effects to an entire Group -
previously, they could be applied only to individual layers. And the
Eyedropper tool has now been tweaked so that it can sample underlying
layers as if intervening Adjustment Layers weren't there, which makes
patching and retouching very much easier.
Beyond image editing in Photoshop CS6
Users of the Regular edition of Photoshop CS6 will be delighted to
learn that movie editing capability has made the leap over from the
Extended edition. This means everyone can now edit movies right inside
the app: you can apply all the standard selection of filters and
distortions to moving images, as well as adding animated layers on top.
You'll still need to buy the Extended edition if you want to use the
3D Layer tools, which have had a major overhaul in this release. New HUD
controls allow you to extrude, revolve and twist 3D objects directly in
the middle of the artwork, as well as adding bevels and inflation.
Changing light direction is simply a matter of shift-clicking on a
shadow and dragging to where you want it. There are many more 3D
enhancements, including text and Bezier outlines on extruded shapes that
can be edited after extrusion has been applied, and the ability to
define a Ground Plane inside the Vanishing Point filter, and then use it
as the basis for snapping 3D objects and locating shadows. The ability to define a ground plane in Vanishing Point in
Photoshop CS6 means you can integrate 3D objects into your scene with
greater ease - and greater realism
Creative Cloud update
Now available as part of a Creative Cloud
subscription, Photoshop weighs in at around 670MB. Once you've signed
up for Adobe's new service, you simply download an installer app, which
keeps tabs on the apps you have on your system. And this isn't software
'in the cloud'; Adobe Photoshop CS6 is still installed on your system,
and you don't have to stay connected to the web to use the app. This
means that the initial download can take a fair bit of time, so ensure
you factor this in before you start the installation process.
We've only just started using Creative Cloud, but the option to store
your files in the cloud, quickly drag and drop images into the browser,
create colour swatches from your pics, and add the ASE swatch files to
Photoshop is already getting us excited. There's not a huge amount of
integration with Photoshop just yet, but with the option to roll out
incremental updates via the Creative Cloud service, we can't wait to see
what Adobe has in store over the coming months.
Photoshop CS6 pricing
Full £556 (ex VAT), Upgrade £159 (ex VAT), £38.11/month as part of
annual Creative Cloud subscription and £57.17/month as part of
month-by-month Creative Cloud subscription. For details on where to buy,
please visit the Adobe Store.
Photoshop CS6 system specs
For system specifications for Adobe Photoshop CS6, and other apps in Adobe CS6, please visit our Adobe system specs page.
Designer views of Photoshop CS6
We've spoken to a number of designers from across the creative
landscape - from 3D, web design, illustration and more - and asked them
to reveal their favourite new features in Photoshop CS6. Here's what
they had to say! (Click below to see their views.)
Click to reveal design opinions
Verdict:
Score 10/10
Photoshop CS6 is a major upgrade that will appeal to many kinds of
users. Montage artists and retouchers will appreciate the new Blur and
Liquify filters, the HUD controls and the ability to sort layers by
type; designers will value the new text and Shape tools; and anyone with
a recent digital camera will find the movie editing functionality a
major bonus. Those who fork out for the Extended edition will find 3D
object creation is easier than ever, and the new ability to match the 3D
perspective with the perspective of a photographed scene means 3D
objects can be seamlessly integrated into your artwork. But what really
marks out this version is the time-saving nature of the enhancements,
which means it should pay for itself in a very short time. Everything
feels slicker, smoother and more sure; the fact that so many filters now
act in real time means there's no waiting for the computer to catch up
with your actions. It's definitely a recommended upgrade.
Uppers
Head-Up Display adjustments
GPU-accelerated graphics performance any interface enhancements
We've partnered with online portfolio site Behance to bring you
inspiring work from some of the most exciting designers on the planet.
This week: Seattle graphic designer Dusty Diamond.
Dusty Diamond
is an independent graphic designer based in the Seattle area who's
worked both in large agency settings and as an independent contractor.
An experienced illustrator, he enjoys the challenge of creating
unique design solutions that seamlessly combine all areas of his
expertise. When not in his office, you can find him somewhere in the
mountains or around the way sampling some of the best brew the northwest
has to offer.
His portfolio is wide-ranging, taking in T-shirt illustrations,
videogame promotion, logo design and much more beside. We've selected
five of our favourites, but head to Behance to check out a fuller selection of Diamond's imaginative and inspiring work.
01. Logo
Whatever you think of this design, it's certainly attention grabbing
This awesome logo for a snowboarding video is as eye-catching as it
is imaginative (albeit slightly disturbing at the same time).
02. Postcard
We're not sure what it is, but we'd love to have one as a pet
Diamond created this awesome postcard design for designer and classmate Lisa Volz.
03. Advertisement
The Elvis impersonator skeleton is our favourite
This full page advertisement announces Symptoms and Spooky Kookys: two new vinyl toy lines from Flapjack Toys, a new company from Mike Becker (formerly of FunKo).
It's a vinyl sleeve! It's a poster! It's great, that's what it is.
We love our album art
at Creative Bloq and think back wistfully to the days when the record
player reigned supreme. But vinyl's by no means dead, and Diamond
created this 7-inch inch vinyl packaging - in the form of a 18x24-inch
folded poster sleeve - for Seattle indie band Forgive Durden.
05. Branding
Making a Microsoft product look hip is a tall order, but we reckon he's managed it here
This illustrated brand work for the Xbox Music Showcase initiative puts a refreshing new spin on the videogame console's image.
Shopping for a new icon? Look no further. Learn how to create a
custom shopping basket icon for your next web design project. We’ll
combine 3D qualities with a flat look. You’ll need a firm understanding
of Adobe Illustrators tools to complete this tutorial.
Final Image Preview
Below
is the final design we will be working towards. Want access to the full
Vector Source files and downloadable copies of every tutorial,
including this one? Join VECTORTUTS PLUS for just $19/month. You can view the final image preview below.
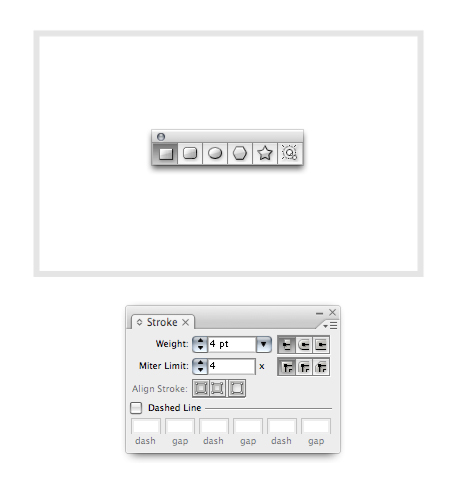
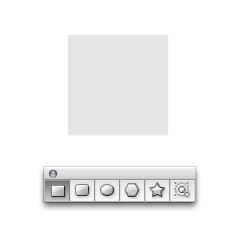
Step 1
Start
by selecting the Rectangle Tool (M) and drawing a rectangle with a 4 pt
stroke. Ensure that you are using a light color for the stroke so you
can see what you’re doing when you apply the 3D effect. Do not apply a
fill to the rectangle.
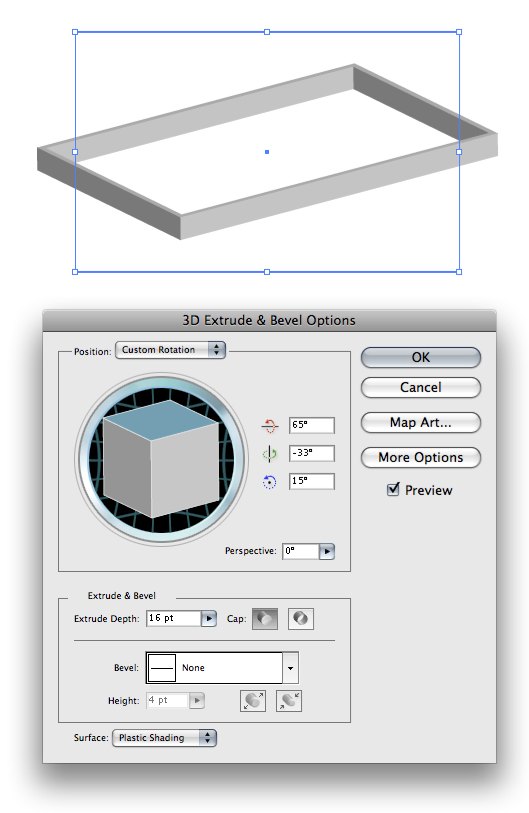
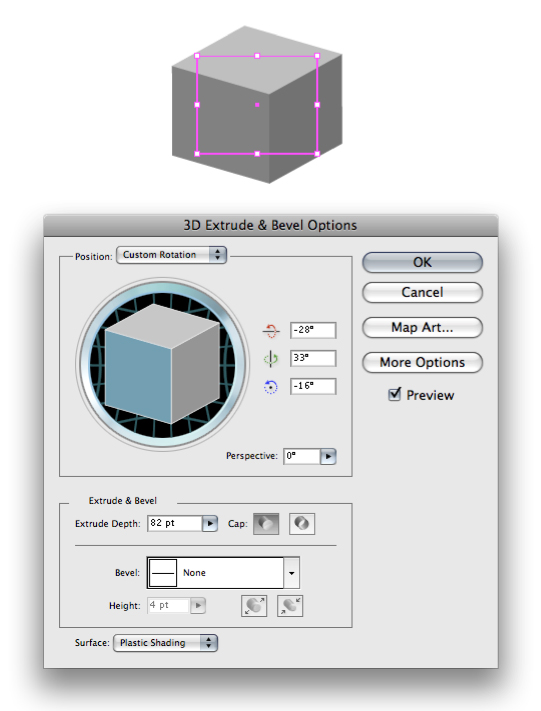
Step 2
Go
to Effect > 3D > Extrude & Bevel. Give your shape a rotation
for the X, Y and Z axis’ and an Extrude Depth of about 16. Click OK.
Copy and paste this shape to use for the next step.
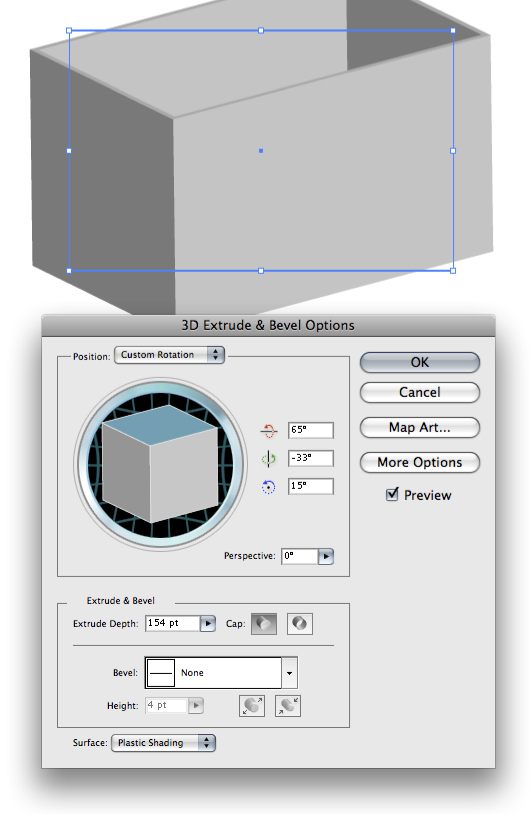
Step 3
In the Appearance Palette double-click on 3D Extrude & Bevel. Enter a much higher Extrude Depth and click OK.
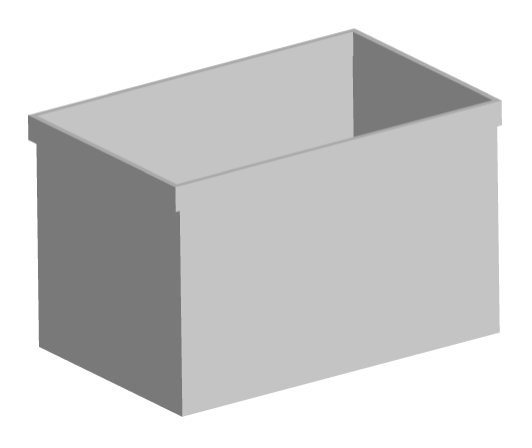
Step 4
Put
the shapes on top of each other and make either the top or bottom shape
slightly smaller or larger than the other. This way you can tell there
are two shapes that comprise the basket. This is what your artwork
should look like right now.
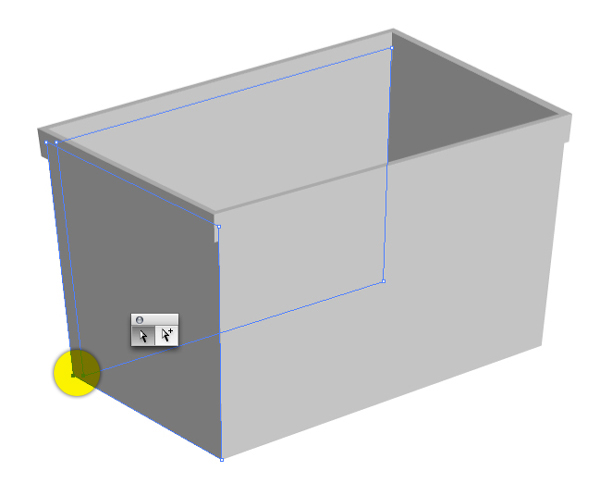
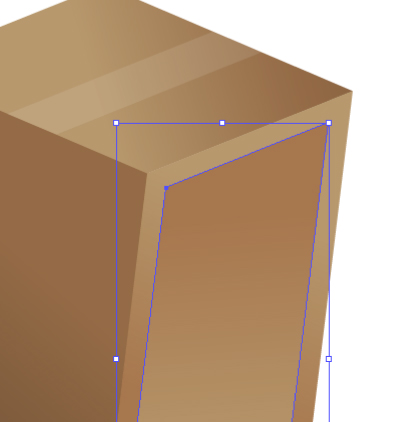
Step 5
In
order to manipulate the shape further you will first need to go to
Object > Expand Appearance. Using the Direct Selection Tool (A), drag
to select the points as highlighted below. Move the points inward a
little so the whole basket is a little skinnier at the bottom.
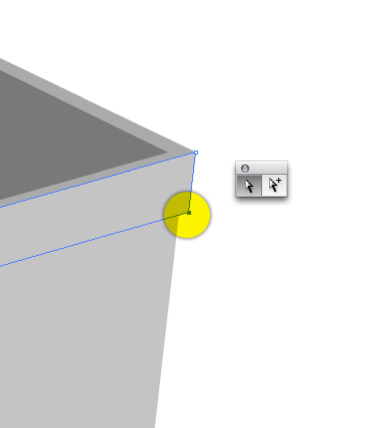
Step 6
Ensure that you move the points around the top edge of the basket too.
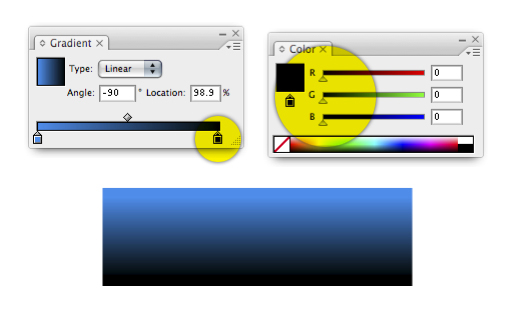
Step 7
We’ll
apply a blue to black gradient on our basket. When working with black
make sure you use a black that has zero values for R,G and B. This will
give you a much richer black.
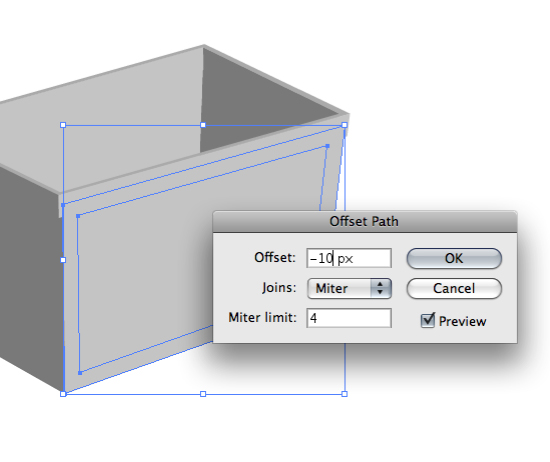
Step 8
Select
the face of the basket and go to Object > Path > Offset Path.
Enter about -10 and click OK. This will create an inner area with the
same proportions of the larger shape. We can then apply two different
colors to the shapes to give the basket more visual interest.
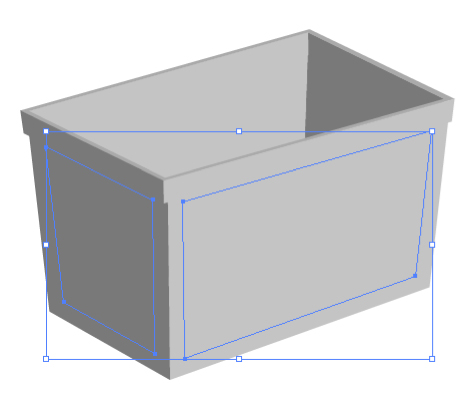
Step 9
Give the other face of the basket the same offset path treatment.
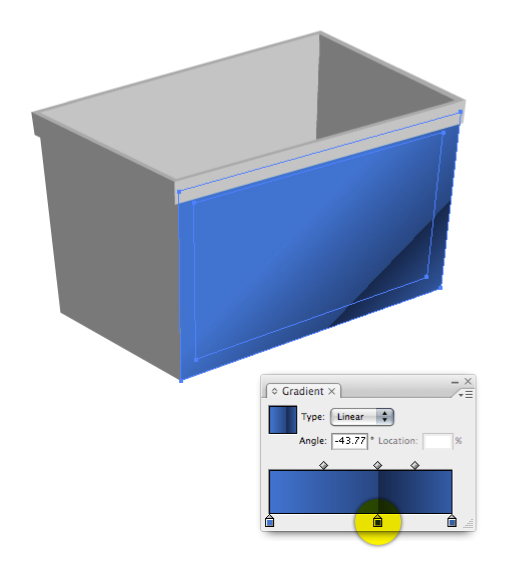
Step 10
If
you want your gradients to be consistent across multiple shapes than
make sure you select both shapes at the same time. I’ve created the look
of a very reflective surface by abruptly changing the color in the
gradient. Getting a realistic reflection will take some experimenting.
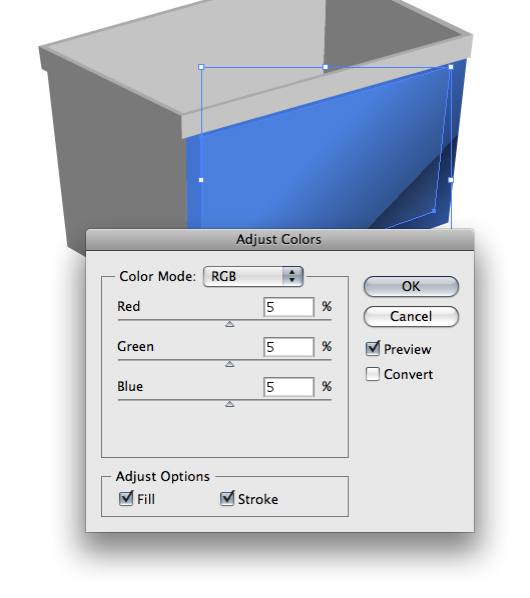
Step 11
Select
the inner area on the face of the basket and go to Edit > Edit
Colors > Adjust Color Balance. Enter 5 for each value and click OK.
This will make the blue color 5 percent lighter on the selected area and
give the impression of a subtle change in the surface of the object.
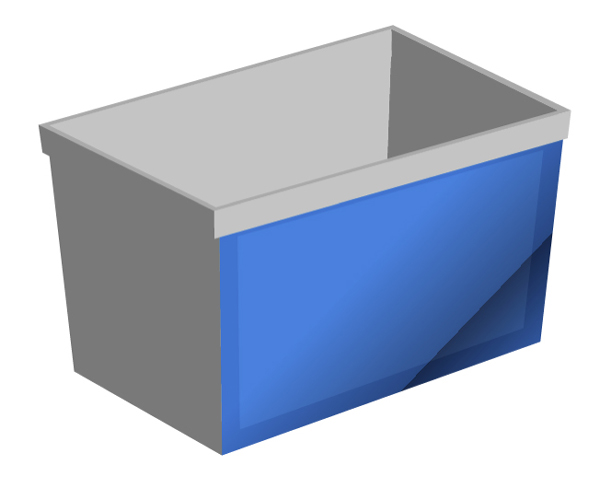
Step 12
This is what your artwork will look like right now.
Step 13
Continue
to give the rest of the basket gradients. Observe how the reflective
look is not too overdone. I tend to give each face of the basket no more
than one abrupt color change. But of course, rules were made to be
broken. Just keep trying different angles and intensities of color until
it looks right to you. Also notice how the inside of the basket does
not make much use of a reflection, only a dark to light gradient.
Step 14
Making
the holes that cut through the basket is easier than you may think.
Using the Pen Tool (P), draw a shape like the one below. Ensure that you
follow the lines of the basket. Basically, making sure that your top
lines are parallel to the top and bottom of the basket and your side
lines are parallel to the sides of the basket.
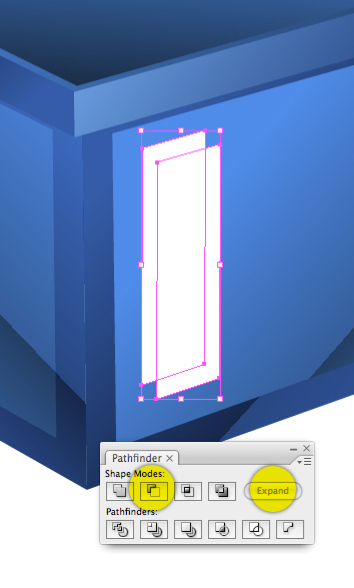
Step 15
Copy and paste the shape and overlap them as shown below. In the Pathfinder select Subtract from Shape Area followed by Expand.
Step 16
You will be left with a shape that looks like the edge of a window.
Step 17
Since
the main window shape is still on the clipboard press Option + F to
paste the window shape precisely where you copied it from. You can now
use this shape to create the other windows. Since the basket shape
tapers down toward the bottom you will need to adjust each window
ever-so-slightly to make them look correct. Use the Direct Selection
Tool to adjust each window shape.
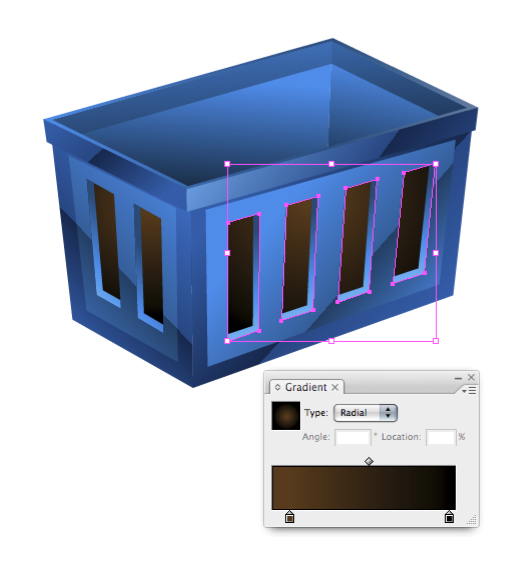
Step 18
Draw the windows on the other face of the basket.
Select
each window shape on the face of one side of the basket and give them a
brown to black gradient simultaneously. This will guarantee that the
gradient is uniform and consistent across all the windows.
Step 19
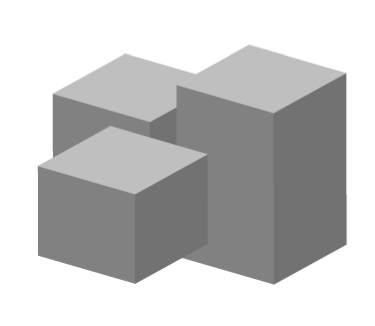
To make the boxes that go inside the basket first draw a square shape.
Step 20
Go to Effect > 3D > Extrude & Bevel. Enter the variables below and click OK.
Step 21
Copy and paste the boxes a couple times and change the Extrude depth to make different heights of boxes.
Step 22
To
continue working with the boxes you will need to expand them by going
to Object > Expand Appearance. Very important: Ungroup all the boxes
until you can no longer ungroup them. To ungroup the boxes go to Object
> Ungroup.
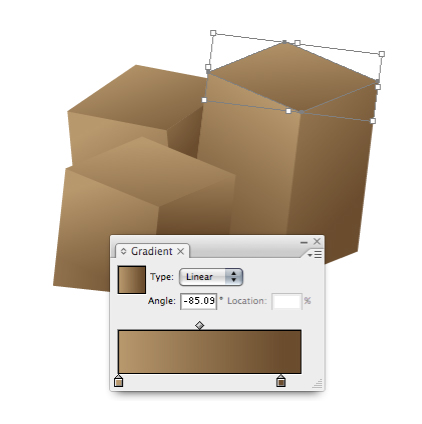
Next, rotate the boxes so they’re all on slightly
different angles. Give them a warm brown gradient making sure to vary
the brightness of each side of the box to create a more realistic look.
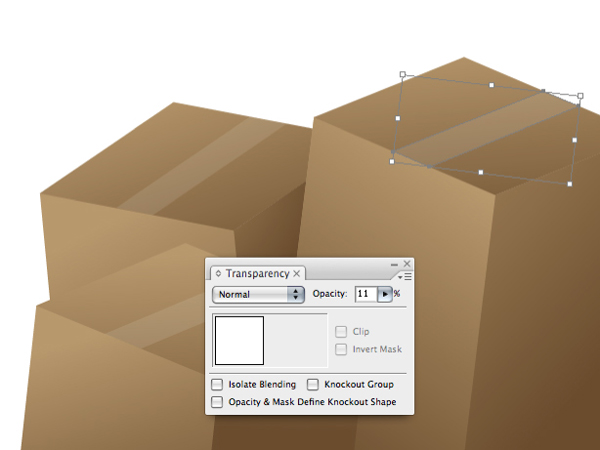
Step 23
Add
a little more detail by copy and pasting the top of the box and using
the Direct Selection Tool to reshape the object to look like a piece of
tape. Fill the shape with white and adjust the Opacity in the
Transparency Palette to about 10%.
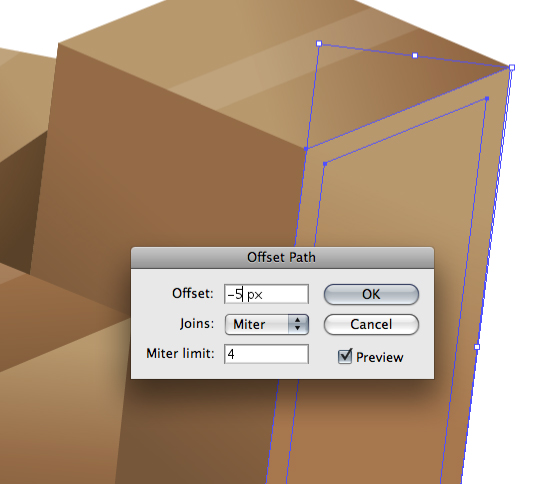
Step 24
Go to Object > Path > Offset Path and enter -5 then click OK.
Step 25
Select the inner shape and adjust the gradient so it doesn’t blend into the other shape behind it.
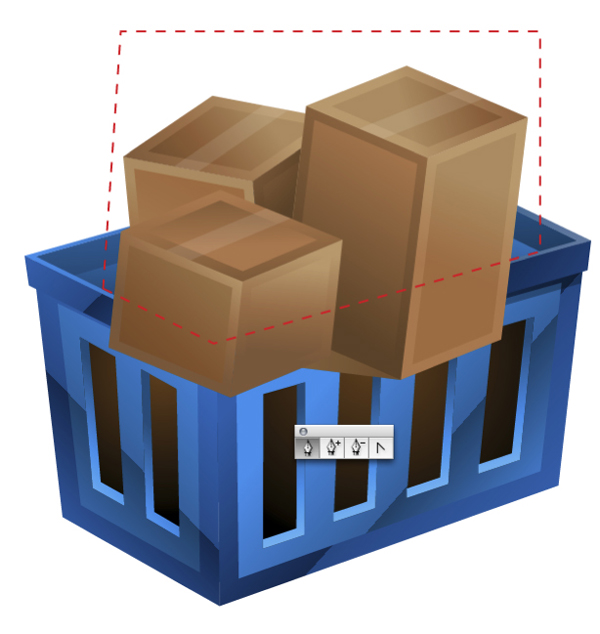
Step 26
A quick way to make it look as if the boxes are inside the basket is to apply a Clipping Mask to the them.
Using
the Pen Tool draw a line where the dotted line is. Your line won’t need
a fill or stroke color. The red line below is just for representation.
Step 27
Make
sure the shape you just drew is in front of the boxes. Select all the
boxes and select the mask shape then go to Object > Clipping Mask
> Make. Your boxes will instantly look like they’re inside of the
basket!
If you would like to further edit the color or shape of
the boxes double-click on them to enter into what is called Isolation
Mode (Illustrator CS3 and up) and adjust them to your liking.
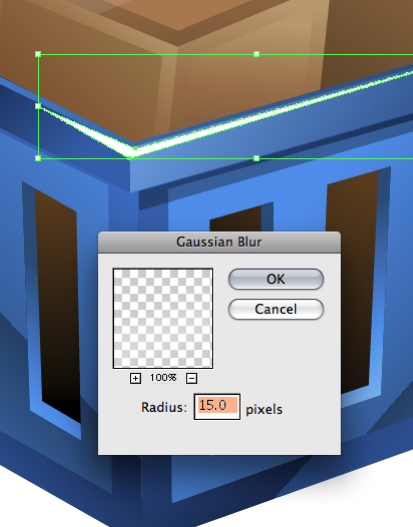
Step 28
Create
some highlights on the basket by first drawing a basic shape with the
Pen Tool. Go to Effect > Blur > Gaussian Blur and enter a variable
that looks good to you.
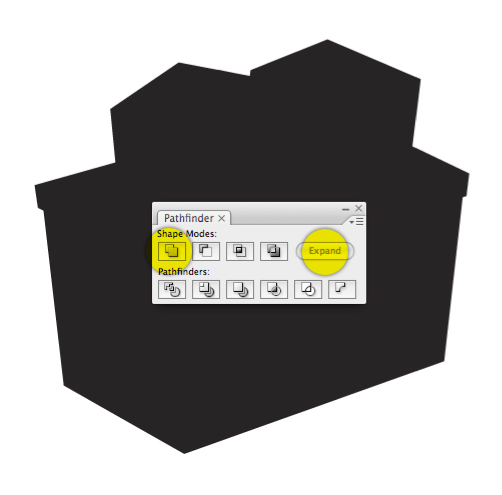
Step 29
Copy
and paste all the elements thus far. Select the copy you just made and
in the Pathfinder Palette select Add to Shape Area followed by Expand.
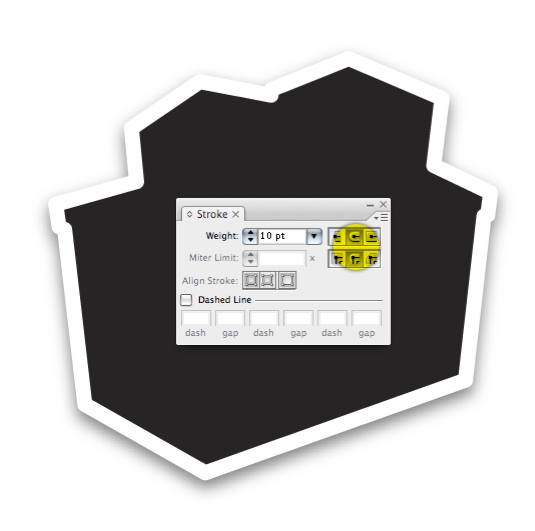
Step 30
Give
this shape a thick stroke. Set the caps to Round and Join as
highlighted below. Next give the shape a drop shadow by going to Effect
> Stylize > Drop Shadow.
Step 31
Put the shape behind everything else.
Step 32
You
can easily make this icon into a set by changing the windows to a blue
to black gradient and making an arrow out of a triangle and square
shape.
Final Image
Here it is, the final shopping basket icons.
Subscribe to the VECTORTUTS RSS Feed to stay up to date with the latest vector tutorials and articles.